Fitting the Son hubdynamo

There are two versions of the Schmidt hub dynamo.
  • The models marked 16"-20" (SON20)are designed for a wheel measuring 399-520mm
  • The models marked 26"-28" (SON28)are designed for a wheel measuring 646-716mm
If the SON20 is built into a large wheel it will have even lower drag, but it will reach 6V3W at 22 km/h (instead of 16 km/h) and thus will not fulfill its typeapproval. If the SON28 is built in a small wheel the no-load voltage at speed will be very high, and could reach a dangerous level.

Installation consists of building the hub into a wheel, and fitting a switched headlight (and rear light if required)

Wheelbuilding
The SON is designed for tangential spoking. Radial spoking is not permitted. Spokehole diameter is optimized for 14g (2mm) spokes, and 14-15 spokes are recommended. An existing rim can be re-used if still straight and unworn, but new spokes are probably required due to the larger flange diameter.

Spokelenght can be calculated with one of the many programs available (I can recommend Spocalc.xls  by Damon Rinard) or with the formula below:
 

l = sqrrt (r1^2 + r2^2 + a^2-2*r1*r2*cos(k*720deg/n))


where k is number of crossings, and n= number of spokes.

By approximation this gives 
 
26"-28" rims 36 H cross 3 l = r2 - 14.0mm
26"-28" rims 32 H cross 3 l = r2 - 9.5mm
406mm rims 36 H cross 2 l = r2 - 12.5mm
406mm rims 36 H cross 3 l = r2 - 22.5mm
406mm rims 32 H cross 2 l = r2 - 20mm

Fitting the wheel
The SON hub is designed for forks with 100 mm OLN and a 9mm axle. Because of the screw-in cover (and diskbrakes) the connectors should be fitted on the righthand side (chainside).  Let the connectors point upwards. Torque the inhex through bolt supplied to 8-10Nm. Alternatively a standard quickrelease can be used. Bounce the wheel and check that the wheel is indeed tight in the dropouts.

Diskbrake
The diskbrake versions of the SON hubs comply to the IS2000 standard. Fit the disk according to the instruction supplied with the brake. Fit the hub (this pertains to any diskbrake) only to forks fitted with 'Lawyers lips'. The forces on the axle with a diskbrake are much higher, and with many forks are aligned with the opening of the dropout. The positive retention afforded by the lips could save the day. And tighten the axle securely and check frequently: grease the threads and torque to 10Nm. Do not use a boutique skewer but a solid and conventional design steel one. 

The diskbrake hub is not suitable for tandems, in a long descent the generated heat will fry the generator..

Use with 28" or 29" (622mm) rims can also problematic, as the IS 2000 standard didn't forsee this application. With larger rims there is very little room between spokes and disk.Check with the diskbrakemanufacturer if sufficient clearance exists.

With Magura the situation is currently as follows:
Martha ok
Louise Freeride  ok
Julie critical, depends on spoking
Clara (discontinued)  no
Louise (-2004) no
Louise (2004-) yes

Headlight
SON headlights are supplied with a heavy-duty coax lead. Plugs are either fitted at the factory or supplied loose for custom lenghts.The assembled 50cm leads are suitable for lights fitted to the forkcrown of a 28" wheeled bike. SON20's are usually supplied with a 1.0m DIY lead.

Start fitting the headlight in the position required. Do not fit the light upside down, as this will give very uneven illumination and cause the ingress of water in many lights.
Fit the plugs as follows:

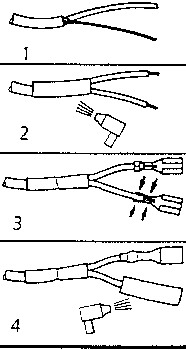
  1. remove about 4cms of outer insulation and twist the underlying wires together
  2. slide a thin piece of heatshrink over the wire and heat with a heatgun (or a lighter) Repeat with a fatter piece to cover the junction .
  3. Bare the isolation over the last 5mm of both wires.Crimp the 4.8mm plugs with a suitable tool or pliers. (add a dab of solder if needed)
  4. cover the plugs with the remaining heatshrink.
Connect the plugs (in no particular order) to the dynamo, and fasten the cable to the fork etc with zip-ties. Leave enough slack to facilitate disconnection. The light is switched on and off with the switch fitted to (usually) the back of the headlight.

Rear light
Rear lights are connected to the headlight. With Lumotec lights you can use a 2.8mm plug connected to the terminal with the lightning symbol. Lights are earthed through the mounting bolt, but a earthing wire can be fitted with either a 2.8mm plug or to the mounting bolt with a crimp eyelet. The dynamo has no earthing of its own. If you use the dynamo without a rear light, replace the bulb in the headlight with one marked 3W. Otherwise bulblife will be short due to overvoltage

Maintenance
The hub is fully enclosed, en -apart from the bearings- contains no moving parts The bearings can not be adjusted or even relubricated without special tools, some slight play is normal for this design. The seals cannot cope with a high pressure hose or submersion, so care should be exercized when cleaning the bike.

Check the wiring occasonally for frays, as the open voltage can be unpleasant.

The hub cannot be serviced without special tools, contact us if you have problems. Read the FAQ first. 

Caution
The open voltage and the power surge during switching can reach high values and give a nasty sting. For this reason you should always use quality wiring and insulation.