 |
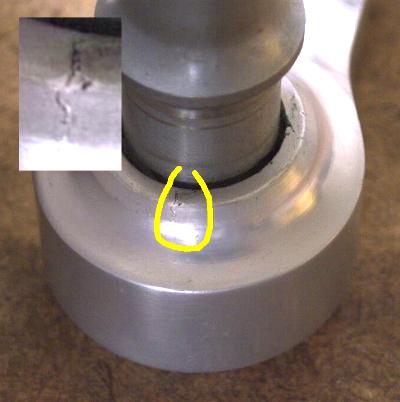
This is a crank which after years of faithfull service has had enough. Cracks are growing from the sharp corners of the internal square, here visible at 3 and 6 o'clock. Time to order a new crankset, and no heavy sprinting please. |
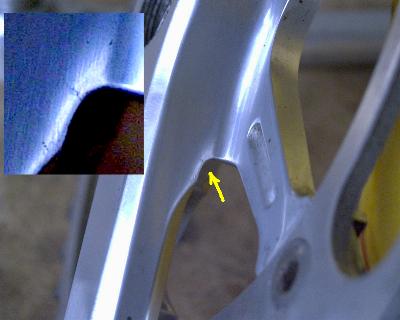 |
The accompanying righthand crank has
also suffered: the crankarm is trying to part
company from the spider. Again a crack has started
on a sharp corner in a heavily stressed area. |
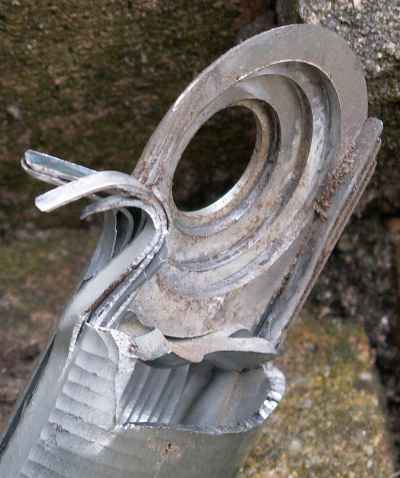 |
200 engineering textbooks can't be
wrong! This is what happens when you incorporate
all stressraisers known to mankind in a single
dynamically loaded part. Maybe the designer
thought the part wouldn't know where to start
failing first for all the possibilities! Click
here for the other side
Photo's courtesy of Bert L:am |
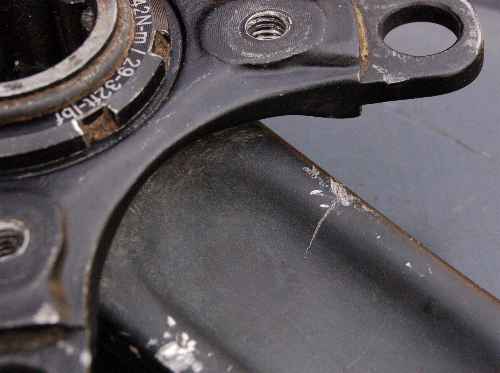 |
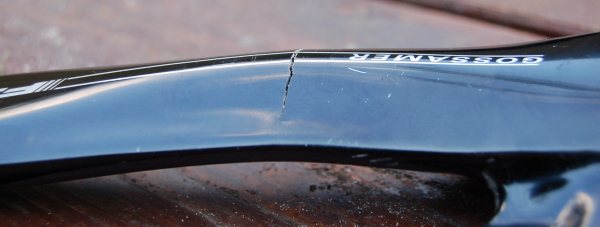
Crack in the righthand crank. A notch caused by a dropped chain has nothing to with it, as demonstrated by the lefthand crank |
 |
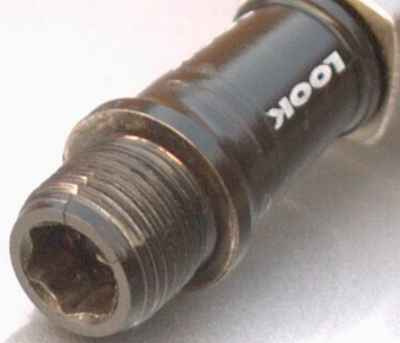
Hey, did i bent my pedalspindle? Nope, just another broken RH crank caught just in time. The surface on in- and outside was free of blemishes, so a combination of bad design and material seems most likely |
 |
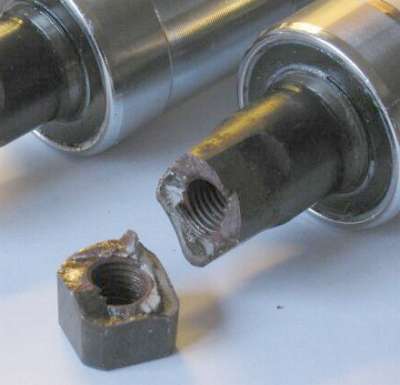
Could we please go back to old-fashioned
spindles with external flats? Here's an axle with
an internal 8mm hexagonal in the threaded end.
That doesn't leave much meat. The result is two
cracks originating from the points of the hexagon,
straight through the threads
Removal was a bear, as the force of the allan-key expands the thread! (solved it by chucking the axle in the lathe) Removal of this kind of pedal on the chainwheelside is a risky business anyhow, you won't be the first needing stitches! |
 |
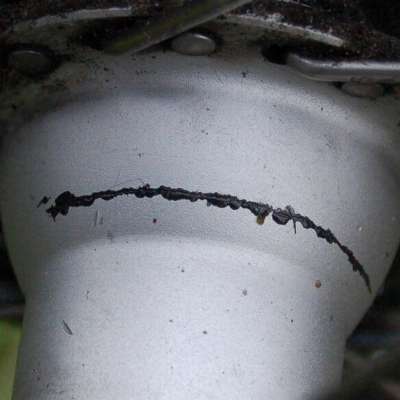
Broken bracket-axle from a spinning
bike. A spinning bike doesn't see any rain, so the bearings will last indefinitely. This isn't true for the axle, certainly when the axle meets with a very hard steel crank. With a steel crank the stresstransition is much more severe, and it looks as the axle snapped just where the crankbolt ended. Spinning bikes can't move from side to side, which must make things harder on the crank too. The crack clearly started in the lower half. The continuing motion has polished the crack-surface until the remaining section grew so small it failed. The fresh failure zone is course. (picture courtesy Marten Hoffmann) |
 |
This is the shell of an XT rearhub (freehubside) The bearings are well lubricated, judging by the grease coming out of the crack! The 5 YO hub has done about 15.000 km's worth of commuting and loaded touring. Crack corresponds with the start of the innerflange which is very thick because it has to support the freehub. |
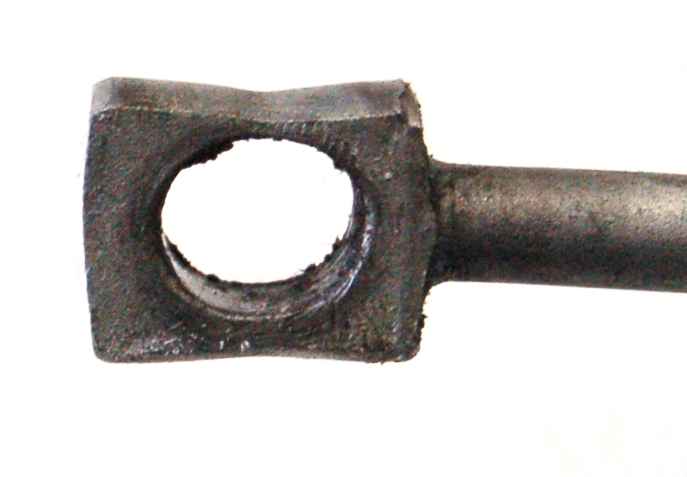 |
This is what an overloaded QR axle looks like. The previously round hole has elongated and the sides show serious necking. It is always a good idea to lubricate the skewer, with less friction there is more clamping force available, and you get a better idea what you're up to |
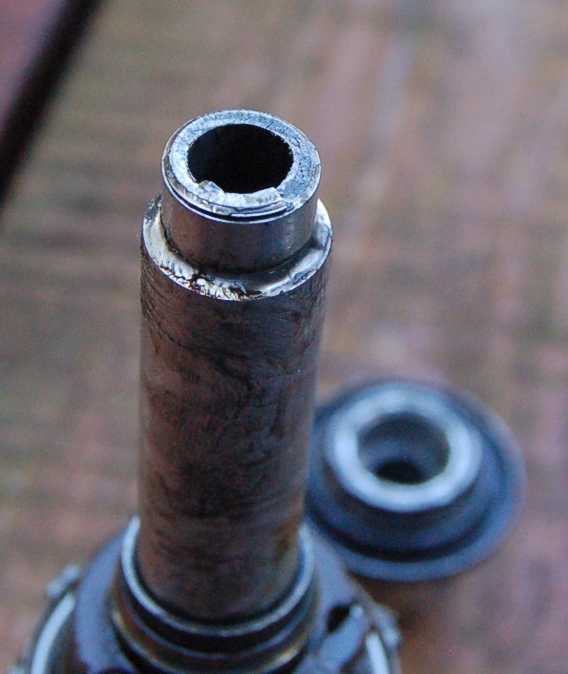 |
A Dura-Ace
axle from a rear hub. It is evident why the hub
suddenly had a lot of play, the axle has broken in
half, with a crack starting in the thread root.
Which is what you get with aluminium. Not cheap
either, and all aluminium Shimano axles differ
slightly, so finding a replacement was not
economical and the wheel was scrapped. |
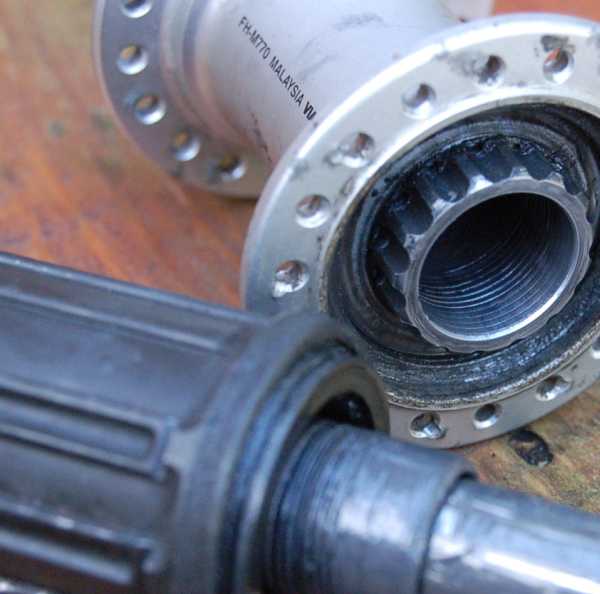 |
Another
Shimano hub which suddenly developed a lot of play.
The hollow bolt securing the freehub to the body has
pulled out all the threads. This design just doesn't
like loaded touring and low gears. That never was a
problem with the predecessor with a steel axle which
gave XT such a good reputation, but then that design
was 30 grams lighter! The fat axle also means less
space for the freehub, so that is another failure
mode |
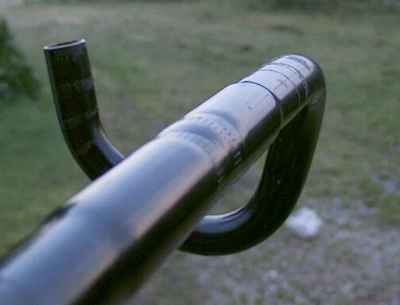 |
A handlebar with severe deformation in
the clamping area. In fact the deformation was so
severe that the bars kept rotating. Excessive
tightening, an aero bar and a large hole in the
barclamp (see the bulge) were probably
contributing factors. Replace at once! |
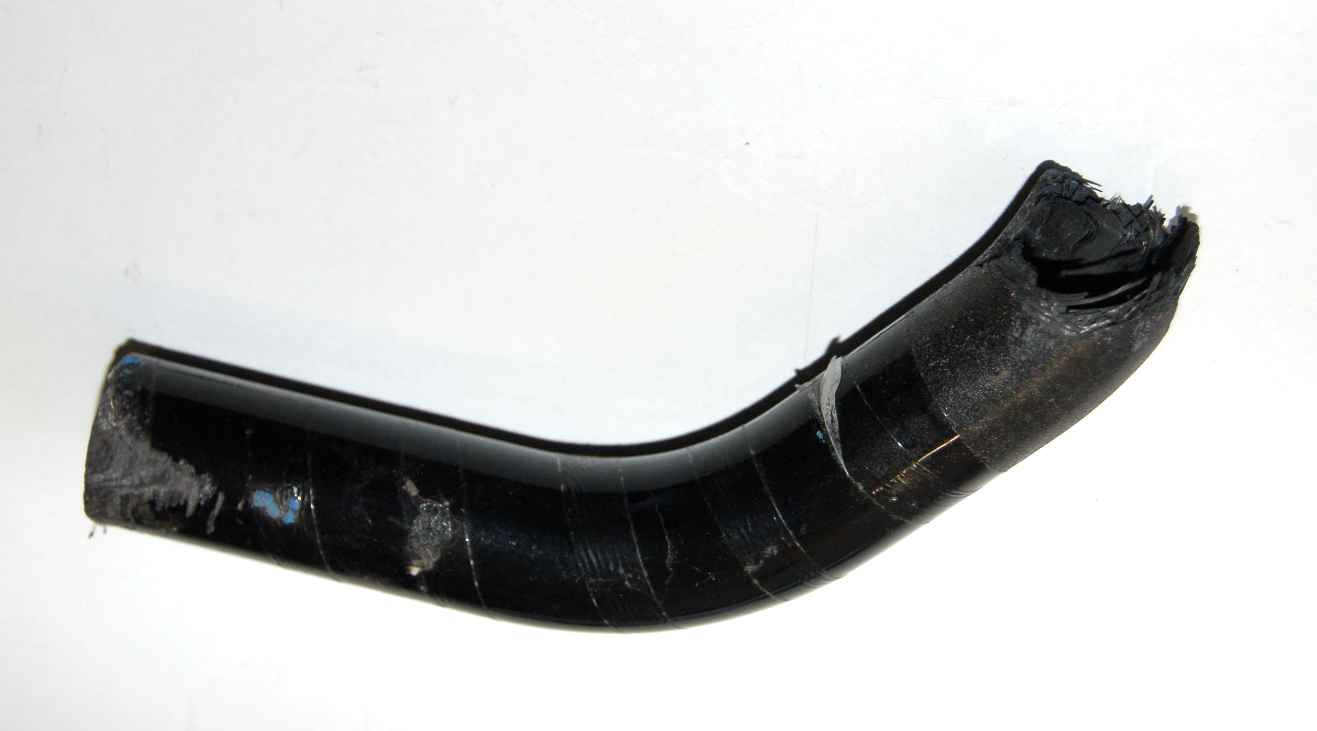 |
With a carbon bar a spill will have far reaching effects. I've never seen a alloy bar crack here, the norm being that you can at least finish the race |
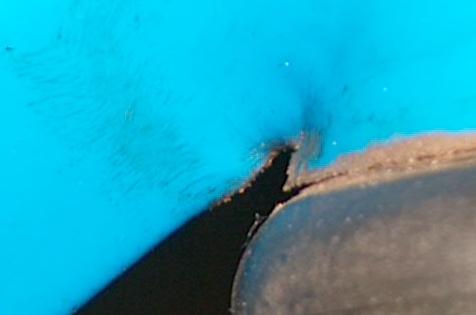 |
There are many ways to stop a bike! See here the downtube-headtube junction in a filletbrazed frame which met with a solid object. The downtube sprouts a double chin (yes, that stubble is cracked clearcoat), and the forkrake suffered a lot too. With a new fork this frame is probably good for another few thousand miles, but it won't handle like new. And keep your eyes peeled for the start of a crack in this area. |
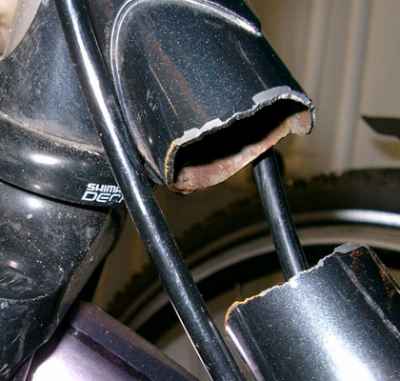 |
Expensive Koga's are not immune from
problems, and the guarantee didn't extend to the
second owner! The crack has started from the sharp point of the bottom lug. From the rust at the bottom section you see it has been awhile and the crack could possible have been spotted before total collapse. The crack took some time untill the remaining section couldn't handle the strain and snapped. (picture courtesy Niels Alsemgeest) |
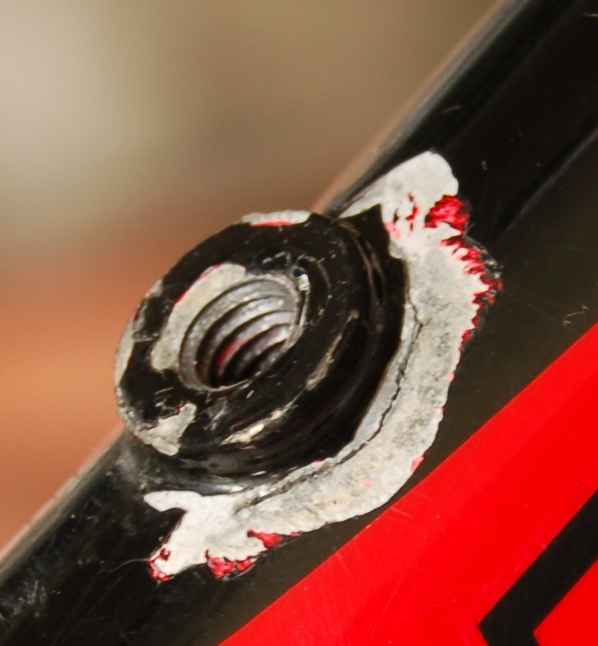 |
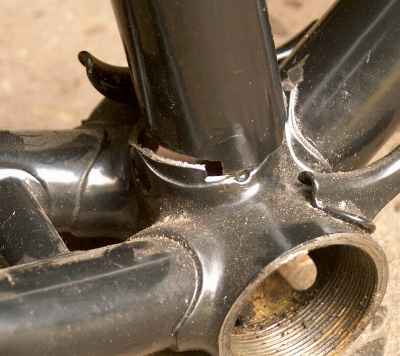
The rivnut (bottlecage mounting) is being pulled through the frame. Not very threathening in this stage, unless the crack starts growing in another direction and then things will happen fast! |
 |
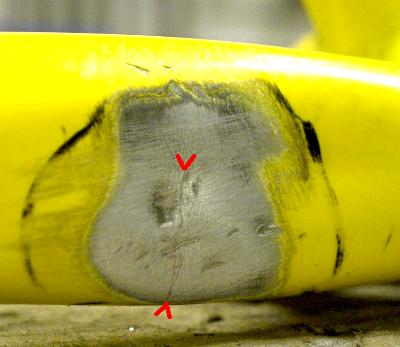
A waste of a fresh powdercoat-job. This side is the final crack, the tear starting on the left side. From the looks of it, it has been there for quite some time. This frame was probably around 25 years old. |
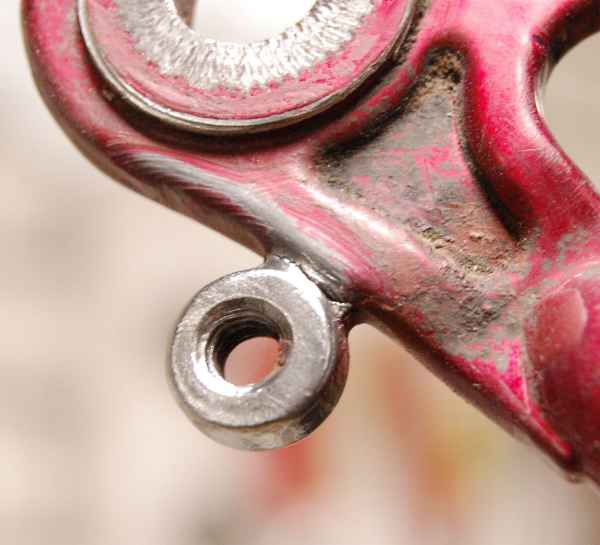 |
Rear dropout with the mudguards mount nearly fallen off. The spotwelded protrusion wasn't meant to take a fully loaded rack |
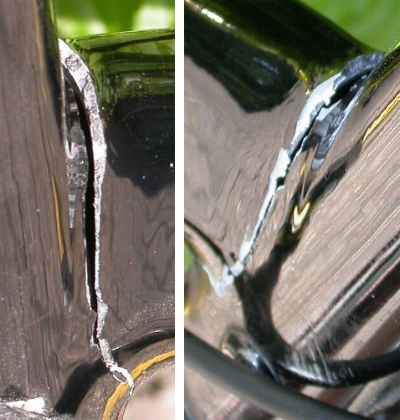 |
This is an expensive frame but luckily
with a guarantee*). What you see is the
downtube-headtube joint. The crack started on the
left side in the heat-affected zone. The tear
looks a bit oxidised, and not as bright as the
final crack on the right. Also note the cracks in
the clearcoat (picture on the left) which show
that the tube has deformed as it broke.
*) replaced in a week
pictures courtesy Franke Nieuwenhuis |
 |
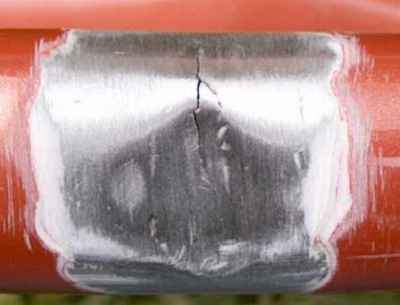
The government health surgeon has determined that pressing on regardless when the chain has caught between chainring and chainstay is detrimental to your -aluminium- frame's life! Here's a fatiguecrack which not accidentally coincides with a deep dent. This won't last a single hard race. |
 |
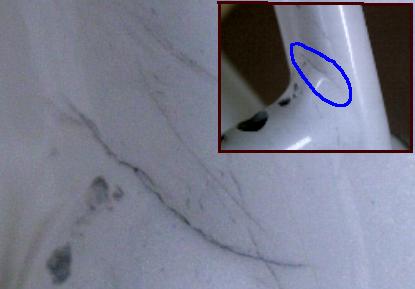
A very thin Tange Prestige tube doesn't like chainsuck at all either. Pity the painter didn't spot this before applying a thick coat of bondo. |
 |
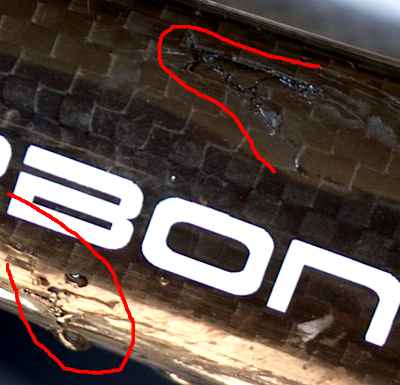
Another crack in an aluminium rear
triangle. This one starts in the thick weld
attaching the bridge to the chainstay (see insert) |
 |
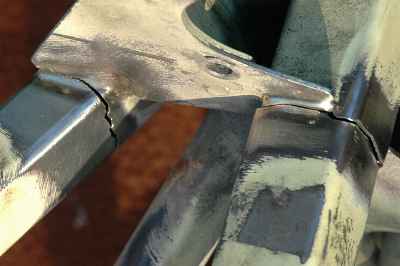
Small racing accident, this is a cracked wishbone. The droplets are water, leaking out through the crack. Frame had to be replaced, the funny sized glued-in wishbone wasn't available: $$$$ ! |
 |
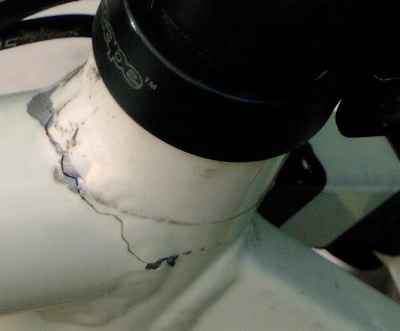
Not a bike but it is Reynolds 531! This is a 40 year old subframe from a well-used Jaguar E-type Cracks start around the stiffener/ suspension mounting point. |
 |
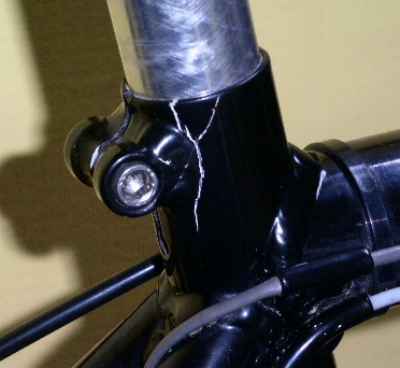
Again a guaranteejob, this time the
toptube has started to part from the seattube on
this aluminium MTB. The seattube is unaffected,
which points to a defective weld. Too short a
seatpost (or a short adapter sleeve) (*) could
give similar problems, but then the crack usually
starts at the rear or from the sides.
(Photo courtesy Bert Lam) (*) Seat post or sleeve should be inserted at least 2 cm below the toptube |
 |
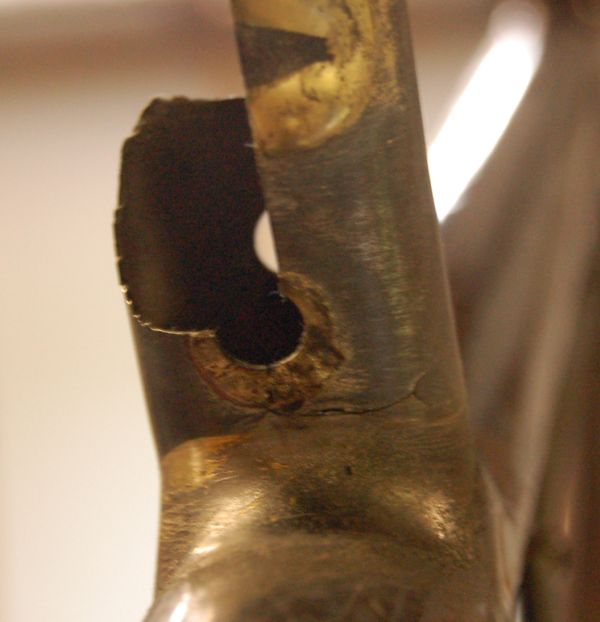
Another demonstration of why loose
non-welded seatclamps are popular. The
stressconcentration at the junction of the hefty
lump to the thin walled tube in the heat affected
zone was a bit to much.
Fixed under guarantee by welding up the crack, replacing the clamp with a non-welded version and repaint (Photo courtesy Chris Leurs) |
 |
It is always tempting to slot the
captains seattube last when building a
tandemframe. Trouble is that when you use a large
sawblade you have to make two slots front and
back. The result is that the tube looses all
torsional stiffness, not a good idea with a stoker
pulling on the bars. This lasted 10 years or so.
One half has dropped off completly, the other half
has a few large cracks straight through the
reinforcement at the bottom of the slot. |
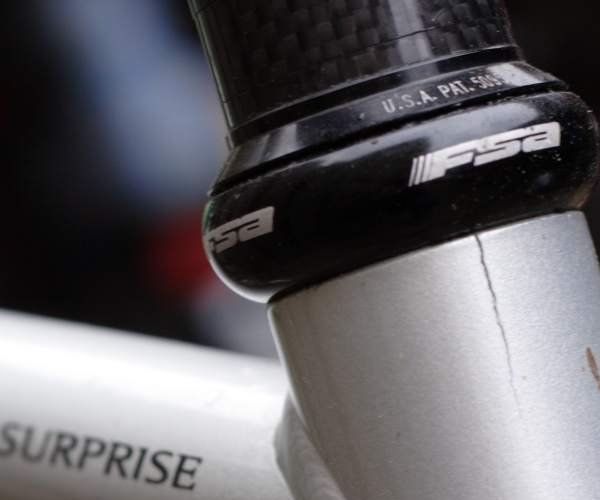 |
A nasty surprise
indeed. Especially with alloy frames it is
tempting to push on regardless when pressing in
the headset. This doesn't always work as the
radial strenght of the tube is pretty low.
Drilling the crack and glueing a reinforcement
ring around could extend the life of this frame (Photo courtesy Henk Oosterhuis)
|
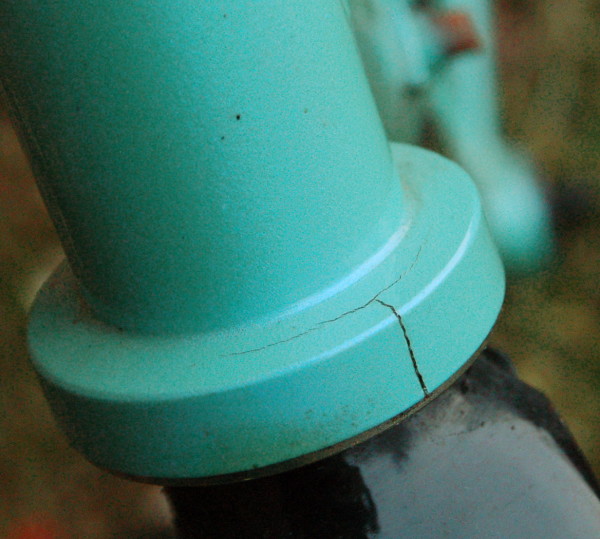 |
Another Italian
frameset, but one with what looks a very mixed
parentage, on the road to the great blue skies.
The semi-integrated cup has pushed the seat apart.
The sense and beauty of this design escapes me
totally. However it looks feasible to chop off
this sillyness and to install a conventional
headset |
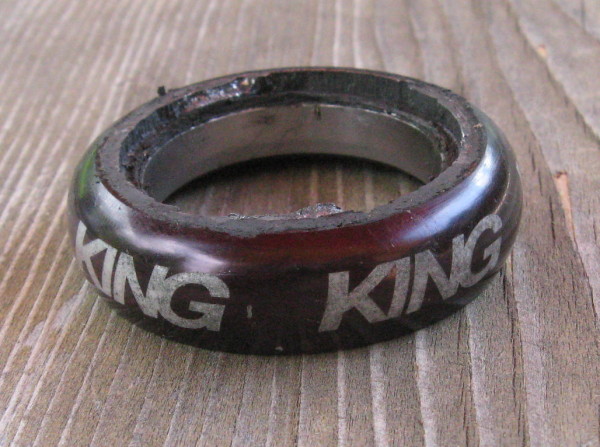 |
This bottom headcup
has completely shared off (the remains off the
pressfit are still in the frame), and than
re-adjusting the headset will not help. 7 years of
enthusiastic trailriding was a bit too much
appearently |
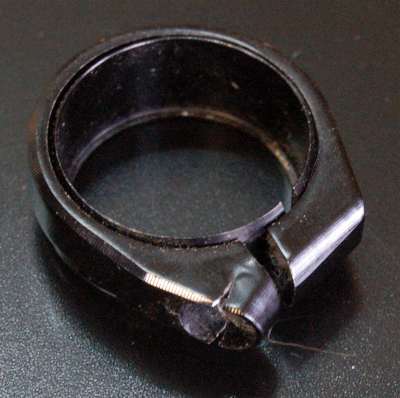 |
Rather embarrasing if this clamp breaks during a ride, but easily replaced with a sturdier version with more meat where it counts |
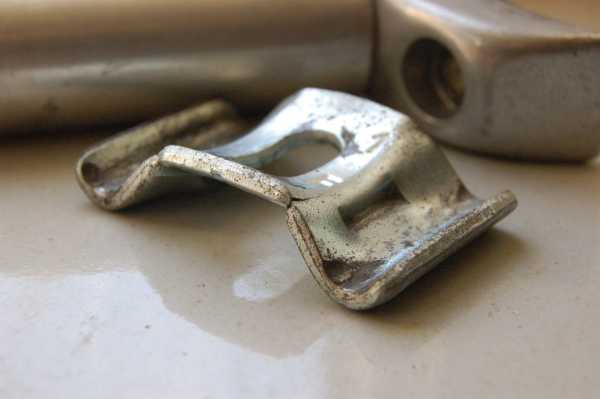 |
My saddle keeps
shifting back! For the moment that is, until the
crack goes all the way or the single bolt can't
stand the desperate attempts to fix the problem |
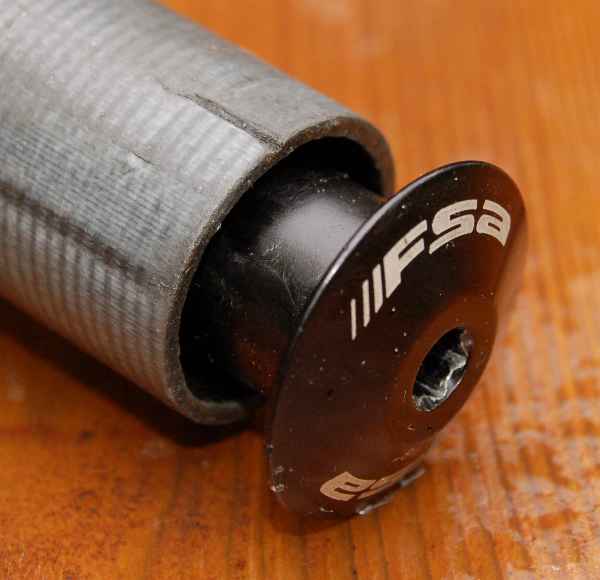 |
Cracked carbon steerer. Probably due to
insufficient support by the plug, I'd rather see a
full tubular style here. But a fancy cutaway stem
wasn't helpfull either.
I try to fit stems on carbon steerers with a 5mm shim on top of the stem, which should move some of the clamping force away from the edge. |
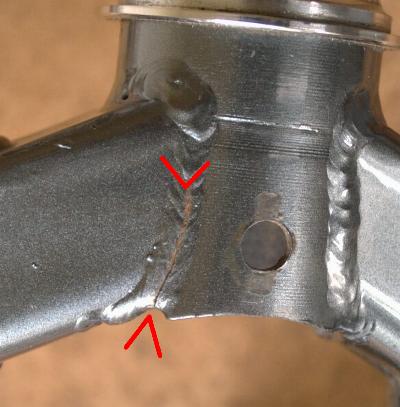 |
See here the forkcrown of an only 5 holidays old Giant Expedition.The stiff boxsections of the crownhalves are welded to a flexible (thinwalled & large diameter) steerertube. This ensures that the welds are higly stressed. The undercutting (^) in the steerertube, where the weld goes round the corner gives this poor design the kiss of death. I would hate to ride this fork much further, the fork will probably collapse if you have to make an emergencystop. |
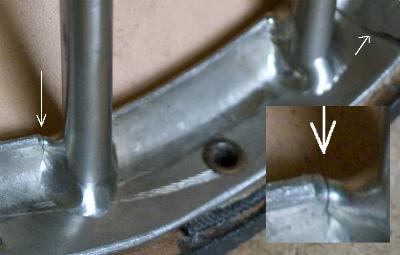 |
The welder has cut through the seat-rail, creating a notch. This stressraiser does as can be expected |
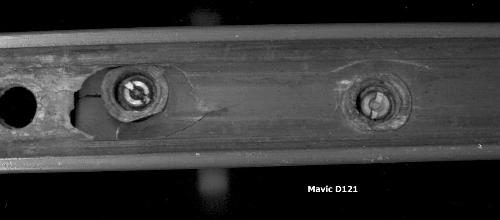 |
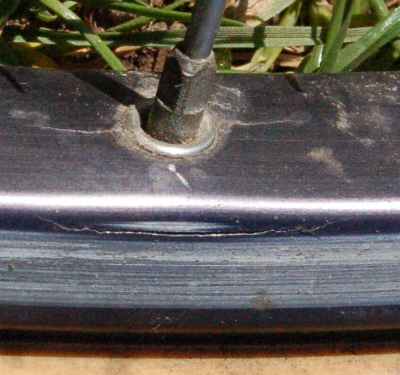
Double eyeletted Mavic which cried enough after 3000 km's. The rim stayed true enough to finish the trip but you can see straight through! Rim was advertized as featuring 'bomb proof strenght' and a for best use of 'heavy loads'. |
 |
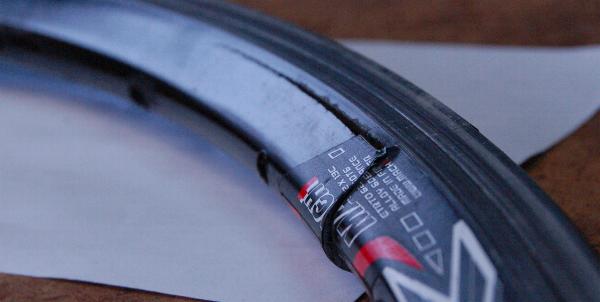
Another cracked rim, but you can't really blame it. Some cycleshop had managed to build it with straight gauge #13 spokes (aka telegraph poles) at 150 kgs of tension. Massive overtensioned spokes without give do not build into a reliable wheel. You'll never break a spoke again sir, indeed! |
 |
And
yet
another one |
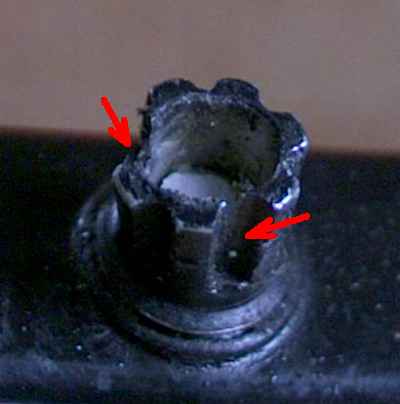 |
This is a spokenipple of a Mavic Ksirium SSC rim. The nipple is threaded into the rim and cannot move. With a heavy sprinter the spoke will now have to bend at the exit: The nipple has cracked open and the aluminium spoke has sheared in two |
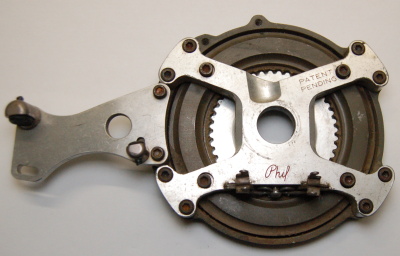 |
Phil
Wood
usually makes some nice kit, but this diskbreak for
tandems from the 70's is nice junk! The
problem lies with the frictiondisk, which is
supposed to stay keyed to the hubadapter by means of
simple serrations. However the construction is way
to weak and the serrations can shear of
unexpectedly, leaving you without braking.
However, unexpectedly? Clic here (Many thanks to Harvey Sachs for the donation of this piece of cyling history) |
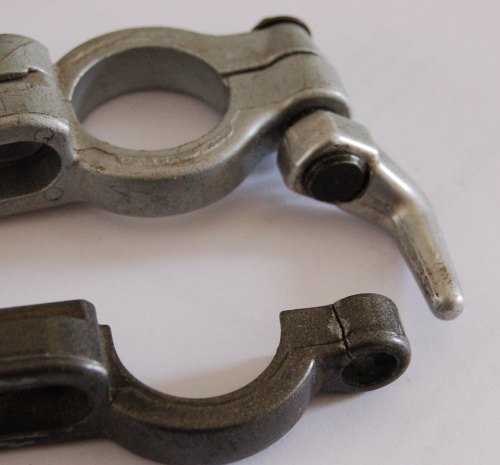 |
The earliest version of the Magura
adapter featured a conical interface for the ears,
to enable them to be rotated in any position. But
the adapters (as any Magura part) are cast in a
soft alumnium and not well suited for gross
misuse. This part was evidently done up really
tight, causing the conical hole to be forced open
and crack! (later versions have a serrated
interface, which will not split in this way)
|
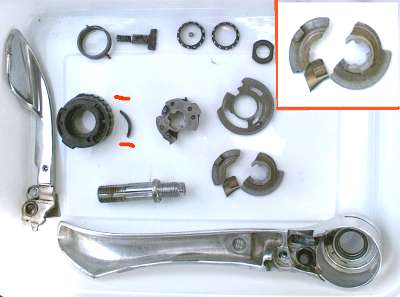 |
Unless you're into watchrepairs I suggest you leave a STI shifter wll alone. No spares are available, so try to get a failed shifter warrantied first! Note the broken sintered? parts |