|
Is
your stem inline with the front wheel? That is always tricky to achieve
without trial and error. Turning the bars so that you can reference of
the complete wheel makes this job a lot easier |
 |
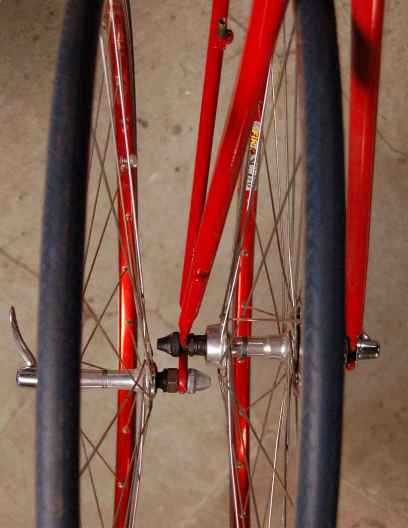
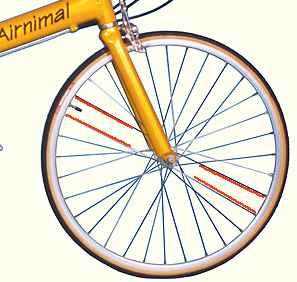
To check if the rim is centered over the locknuts
you use a dishing gauge. Put the gauge againts the rim and move the
pointer to the locknut. Flip the wheel over, and if your wheel is
accurately centered ie symmetrical you get the same reading. If you get
a gap the centering is of by half the amount. A dishing gauge is to be
prefered over relying on a truing stand which will usually be slightly
off. |
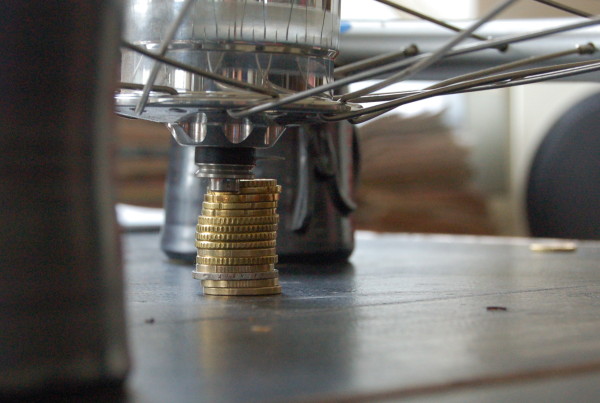 |
On the road you can make do with whatever you can get your hands on. The official version of the Bistro Dishing Gauge [tm] uses a tabletop in the shade, two glasses of beer and an ashtray, but two coffeemugs and some change will work in a pinch (picture] |
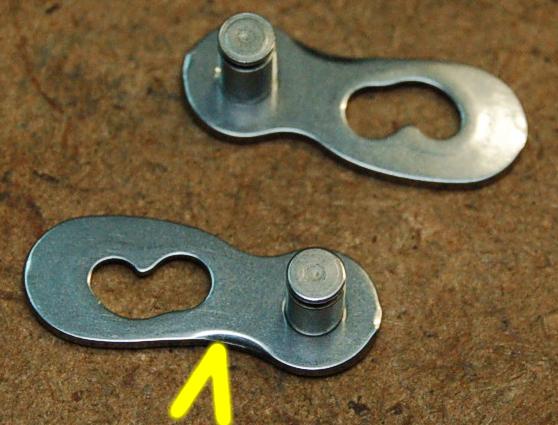 |
The powerlink for Wipperman Connex chains is supplied with a large sheet of instructions. These are needed because mounting the asymmetric link upside down could cause skipping on the 11T cog. However I could never remember the correct orientation with the instructions supplied. Once you know how it is easy though, as only one side of the link is chamfered to facilitate shifting (arrow). Mount this side facing the teeth on cogs/chainwheel. |
| RIVNUTS |
|
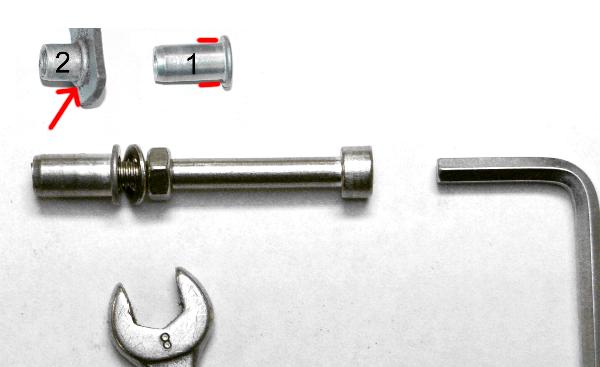 |
Rivnuts are used
in alloy frames to fit the bottlecages. They consist of a hollow rivet
which expands when you pull up the threaded bottomsection. 1 is
an uninstalled rivnut, with the expanding section outlined in red. 2 is
the rivnut installed, with the arrow pointing at the formed shoulder. For installation you need a special tool, but a ratling rivnut can often be tightened up with a bolt, washer and nut. |
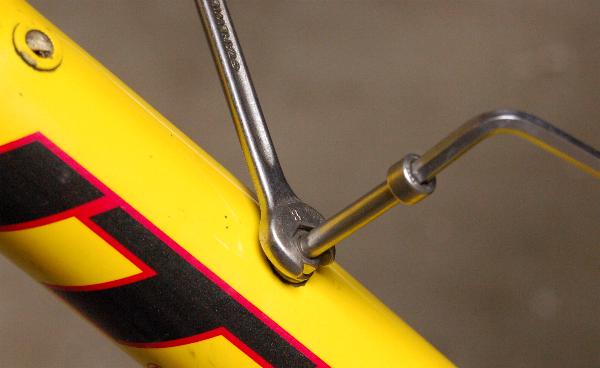 |
Screw down the
bolt in the rivnut as far as it will go by hand. Carefully tighten the nut while preventing the bolt from turning |
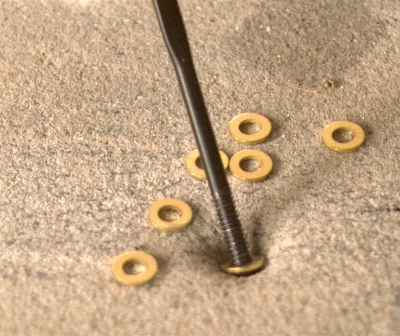
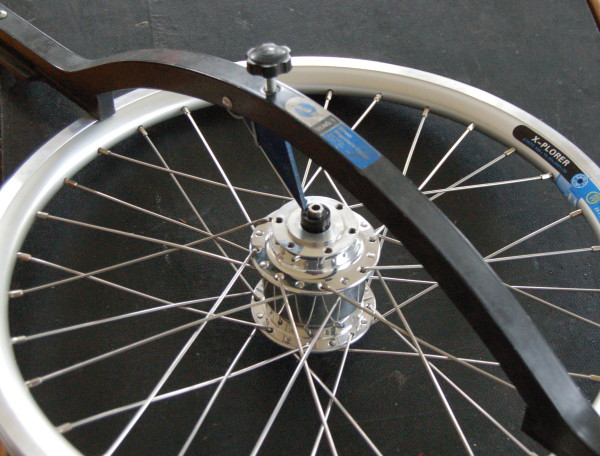
Spokewashers Spokes inserted in steel flanged hubs (eg Hubgears) usually benefit greatly from using spokewashers to improve the fit. Putting a tiny washer on every spoke is however a fiddly job. It becomes much easier if you place the washers on a flexible surface (here a rubber sanding pad) . You can now spear a washer in a single movement!
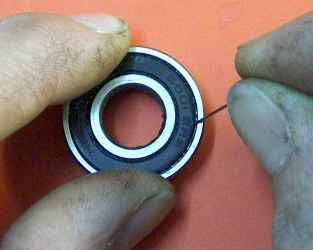
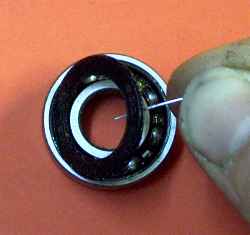
Bleeding hydraulic brakes  Hydraulic brakes use either mineral oil (Magura, Shimano) or automotive brakefluid (e.g Hope). The mineral oil is available in very small bottles (Magura Blood) or als LHM (Citroen suspension) oil at the motorfactors. Motorfactors also sell brakefluid, but as this is hygroscopic it is best to buy this in small quantities. For storage squeeze as much air out of the botlle as possible and screw down the top tight. Never use oil in a system designed for brakefluid or the other way round as this will destroy the rubber seals. Systems filled with DOT 5.1 can be used with DOT 4.0 (after flushing with mineral spirits), but never with DOT 5.0! Repacking bearings Many hubs are equipped with sealed cartridge bearings. These bearings are lubricated for life, ie when the lubricant becomes saturated with water your bearing will die. If time doesn't equal money you could try to replace the lubricant. Depending on the wheelset you might have to remove the bearings first. Pry the rubber seal from the bearing with a needle, starting at the edge. (ill 1) Once you've got a beginning work your way round, taking care not to destroy the lip running on the inner bearing.(ill.2) Now you can wash out the old grease (and rust?) blow dry and repack. Fill with as much grease as possible, and pop the cover back in place
|
||
| Tip 8 Removing old handlebartape can be very timeconsuming. Especially cork-tape has a tendency to tear, which means you have to remove numerous small bits. I prefer the following method which softens the glue first:
Start unwrapping the tape when it feels warm to the touch. |
||
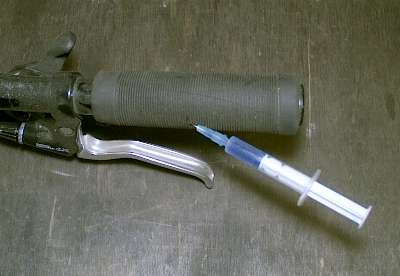
| Tip 7
Removing grips can be a bear. Some people manage with brute force, I prefer more subtle methods.Take a syringe (ask your vet, farmers shop, local junkie ;) w.h.y.), and fill it with meths. Insert the needle through the grip and squirt some liquid between grip and bar. Massage the liquid along the grip and it will loose adhesion. You can now slide the grip of without trouble. To refit, wet the inside of the grip with again methylated spirit, it will slide on without fuss, and once the spirit has evaporated the grip will be tight again. Instead of meths, water will work too but it will take longer to evaporate. |
||
| Tip 6 A pot of grease on the workbench easily becomes a mess. Adding grease to some part isn't very convenient either. Both problems are solved with a large (50ml) disposable syringe, available from a vet or a farm supplies shop. Pull the plunger, spoon in grease from the tub (I use a 5" steel ruler) and refit the plunger. 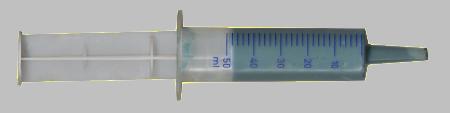 |
||
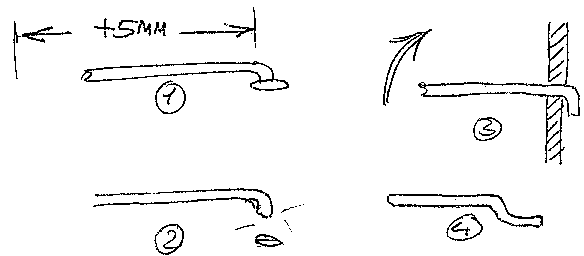
| Tip 5 An emergency spoke is usefull for a temporary repair of a broken driveside spoke, without having first to remove the freewheel or cassette. Emergency spokes are available for serious money (Simpson etc) but are not difficult to make yourself:
|
||
| Tip 4 | ||
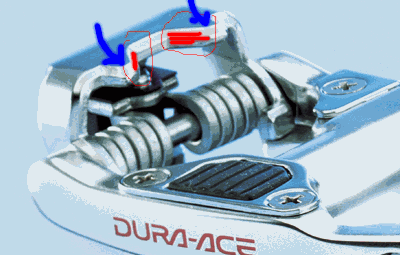
New Shimano SPD-R pedals
can be very difficult to release, even with the springtension set low.
With time this improves, but at first it can be downright dangerous.
The
problem is caused by the way the catchplate is manufactured. It is
punched,
and the resulting burr is nicely chromed but still very rough. That is
ok on most sides, but not on the ramp used for releasing the cleat as
it
will catch instead of slide. Lubricating is a temporary fix, but a more
permanent solution is simple: deburr the ramps (marked in red) with
emerycloth,
file or Dremeltool. If you want to decrease the engagementforce you can
radius the entryramp (marked blue) as well. On the topline Dura-Ace
pedals
this is already done at the factory, but on cheaper pedals finish is
well...
cheaper.
 |
||
| Tip 3 | ||
Many hubs (e.g. all Shimano
hubs) are equipped with cup and cone bearings. These hubs are supplied
new with zero adjusted play, as otherwise wheelbuilding would be
impossible.
However, when installed, the tension of the quick release skewer
compresses
the axle and subsequently most hubs are run with the bearings very
tight.
After wheelbuilding the bearings should be loosend a bit, but by how
much?
You could try to guess, but actually it is very easy to adjust the
bearing
with the with the axle compressed.
 |
||
| Tip 2 | ||
The sealing ring in Presta
valveheads is a consumable. And the hose usually starts blowing of the
valve at the most inconvenient moments. Pumping tires with one hand on
the pump, using the other to prevent the pumphead from blowing of is
possible
but not very convenient. I prefer a quick fix:
|
||
| Tip 1 | ||
 Threads,
stems and seatposts should be greased before assembly to prevent
corrosion. However a tub of grease on the workbench will become a mess
in very short order. The solution is to use small plastic 35mm
filmcanister
with a hole drilled in the lid. Fill the pot with grease, and stick a
short
brush through the top. Threads,
stems and seatposts should be greased before assembly to prevent
corrosion. However a tub of grease on the workbench will become a mess
in very short order. The solution is to use small plastic 35mm
filmcanister
with a hole drilled in the lid. Fill the pot with grease, and stick a
short
brush through the top. Instead of grease you could also use anti-seeze compound: this has superior anti-corrosive properties, is more pleasant to work with, and not as greasy. Never-Seez is often found at industrial supplyhouses, Shimano Lok-not can be sourced at the cycleshop. Standard containers are far to large for the average home-mechanic, so maybe you can get a refill for your small pot if you ask nicely. |